... like myself.
First off, a big thank you goes to Wayne (Governor) and Gary (SniPer
SR71) for their help, and Damon and Russell for their excellent
instructional write-up.
I think I must've been crazy to do this myself. But I really wanted the
experience, and man, did I get it!
But, even knowing what it took, I'd do it again. And in fact had to do
half of it again.
This write-up will be long, but I figured it might be useful to document
the things someone without much mechanical experience will need to be
prepared for if they decide to do this. I can only write this from my
own experience and observations, so if I write something wrong, please
let me know and I'll update these notes.
(ashley at ashleybradford dot com)
Here are some
photos I took during the procedure.
My Background
First off, my minor automotive background so you know exactly how
little experience I had when I did this:
- One day a couple years ago, I got bitten by the car bug and spent 8 hours
engrossed in Howstuffworks.com
and a couple other sites, learning how cars work. Since then I've been soaking up
all the info I can handle, but that's not the same as hands-on experience...
- Had a 4-banger Pontiac Sunfire on which I changed brakes and rotors,
replaced plugs and ignition springs (it has no wires) and an ignition
control part, changed the oil, changed the fuel filter, balanced and
rotated the tires.
- Took an adult ed class on basic auto maintenance in which I did those
last three things and helped with a tune-up on a Grand Am.
- Replaced the PCV valves on the Z, with some guidance.
The teacher of that class said he'd help me out with the harder parts
of the timing belt operation, and otherwise left me on my own.
Unfortunately after I got it back together and drove it for a while, I
noticed the crank seal he'd installed for me was leaking oil; thus the need
to go in a second time. This time I got help from someone who has done
this work specifically on Z32s several times (Thanks Wayne!).
Intro
This write-up is for the inexperienced - I'm saying this up front so I
don't have to keep writing, "if you've never done this before...", so
just sort of stick that on every paragraph. Some of these things may be
obvious to the pros, but I'm not writing this for them.
First, it's not completely impossible that you can do this in one day,
but it's highly improbable. The reason is all the unexpected things
that can happen. I changed the timing belt twice, and both times ran
into parts I had to order and then wait for. So if you can only be
without your Z for one day, I strongly recommend turning the job over
to someone with experience and spare parts.
The first time through, the unexpected parts that broke or that I
didn't have were some gaskets that weren't even mentioned in the
instructions and some bolts. I'm sure these weren't mentioned because
everyone probably doesn't have problems with them, so you can see how
random this is. The second time through, I decided to replace the idler
pulley studs and we used up all the extra nuts in the extraction
process - didn't want to take a chance with threads that had had that
kind of force applied.
Here are the instructions I used, written by Damon and
Russell - you will definitely appreciate the attention these guys paid
to detail, including numbers of bolts, locations and torque specs, and
then even walking you through reassembly, unlike other instructions I
found that basically said, "Now put it all back together."
I'll be referring to that write-up.
You can get timing belt kits from Courtesy that include all the parts
you need to change out, except the gaskets I'll mention that you may
also want to pick up because they seem to deteriorate with engine block
heat & time.
Coz
also sells a kit.
The additional gaskets I needed were these in the back metal timing belt covers, and the long thin
foam rubber ones that go all the way around the inner edges
of the front timing belt covers, sealing off the timing belt from dust and stuff.
And like Damon and Russell say at the beginning of the procedure, if
you really think you want to do this, read through their whole
procedure first to see what's involved.
Commentary on the list of "Special Tools"
I'd say if you're doing this for your first time, an assistant is
necessary, at least when you get down to the timing belt. A seal puller
is not necessary, but you have to use SOMEthing. What we used the first
time was a small straight screwdriver, and the second time one of those
bent-angle dental-pick-looking tools. And for "thin Lexan plastic", I
didn't know what thickness Lexan was, but something like the thicker
transparency film works, or Bernie mentioned he uses plastic cut from a
soda bottle.
I also back the recommendation for the Mechanix gloves specifically for
handling the timing belt; the first time I handled it with no gloves
and kept feeling sharp pains in my hands that I ignored. Later when I
quit for the night, I found about five 3/8-inch black splinters in my
hands.
You'll also need a long wrench or breaker bar that can handle the crank
bolt, and if you're not strong, strong help to pop it free and then
tighten it. My dad suggests buying lengths of pipe that fit over your
wrench handle to lengthen your leverage. I didn't use any air tools,
but I do have a nice big torque wrench that I was able to use for this.
Zip-ties are also handy for keeping things out of the way.
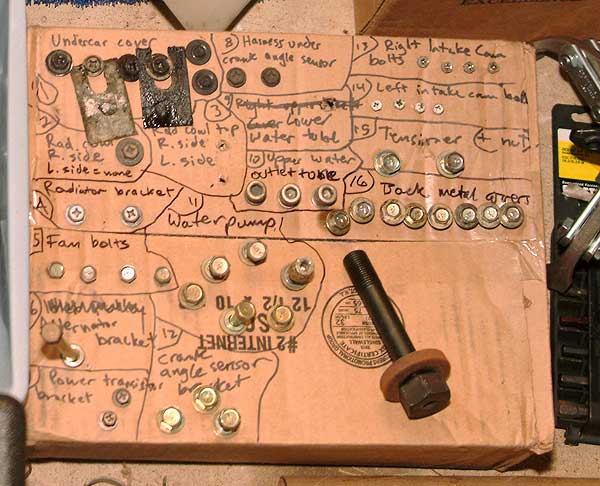
You'll want a box or something to use to keep track of bolts, like this
- do not think that you're going to make a pile of bolts and
remember where they all went. Some of the bolts are even positioned in
the box the way they go in the part, like the water pump bolts:
Additionally, a magnetic bowl is a good thing to have - you can get one
at Sears.
The Procedure
It helps if you didn't drive the car in the last few hours since you'll
be dealing with coolant that will otherwise be hot. My car is a '95
manual TT, so I have no comments on '93 and earlier-, NA- or
automatic-specific instructions.
Do put the front of the car up on jack stands or drive it up on ramps.
Someone said they did the operation without doing that - I don't know how. You have
to go under the car to get to some bolts and things, and also you don't want to do
the whole operation bent over the engine that far - your back will hate you.
To remove rubber tubes and hoses, first twist them where they connect
to the metal parts to get them to break free - often they're stuck and
won't just pull off.
Steps 1-3 are pretty self-explanatory.
Step 4 - I didn't know what a "petcock" was and had to figure that out,
and you'll figure it out, but I'll tell you it's a small assembly
involving a short rubber tube on the bottom of the radiator on the
passenger side, and you open it by turning the black plastic knob on
the side of it, basically unscrewing pressure off it and allowing the
coolant to pass through. You don't have to unscrew the black plastic
knob all the way off, just loosen it a lot.
Step 5 - I was an idiot the first time and couldn't figure out what was
meant by "lower fan shroud". It's hard to see that the thing comes in
two pieces because the place where they connect is hidden at the sides.
So I struggled with yanking the radiator out with the lower shroud
still attached which is a big pain, and it wasn't until it was out that
I could see that, in fact, the lower half of the circular shroud does,
in fact, detach, and the way it does is with simple plastic clips. So
from under the car, look up the sides of that circular piece until you
find those clips and release them. There is one on each side and one
obvious one on the bottom.
Step 9 - For the thin coolant overflow tube, I eventually zip-tied it
to some part that was right there to keep it from dropping down and
draining.
Steps 12-14 - All these parts have adjustment bolts and locking bolts
to allow them to loosen or tighten against the belts, so what you're
doing in loosening all these bolts is taking the tension off the belts
so they can hang loose and be removed.
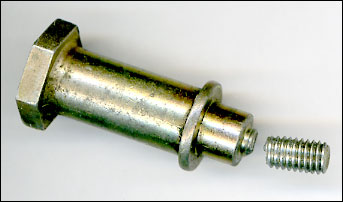
Step 17 - Spacer studs look like this (except hopefully not broken like mine
is):
Step 18 - In order to turn the crank with manual transmission, the car
has to be in neutral. When you eventually need to remove the crank bolt,
put the car in fifth gear.
Step 20 - The woodruff key looks like this - protruding off the left
side of the crank shaft in this photo:
Step 21 - You actually rotate the thermostat counter-clockwise a little
to get it to let go.
You can see the thermostat work if you want to - boil some water in a
pot on the stove and then drop it in. Once it has opened, fish it out
with tongs and watch it close again as it cools. I didn't know how
quickly this happened and wanted to see.
Step 27 - Note the note about the spring and O-ring...
Step 31 - If you are removing the idler pulley studs as well, you'll
need to use a stud extractor, or if, like us, you don't have one,
you'll have to use the lock-nut technique to get them out. This is
described in step 56 except here you'll be loosening the stud instead
of tightening: Screw one nut onto the stud, then a second nut right
after, then hold the back nut with a crescent wrench while holding the
front one tight against it with a socket wrench. Now, while applying
opposing forces to them to hold them tight to each other, turn them
both counter-clockwise. If you're doing this right, the outer nut will
prevent the inner nut from loosening them both and instead the whole
stud will rotate and loosen.
Unfortunately the faces of the two nuts wouldn't line up - lining up is the
most ideal because then you can slip a deep socket over them both and
they act like a bolt head.
Step 33 - I tried to get a screwdriver in between the old seal and the
metal to pry it out, but in order for the screwdriver to fit in there, it
has to be pretty small, and once it's that small, it bends instead of prying...
Kind of a problem. The guy that helped me the first time carefully jammed a
flat screwdriver right into the seal itself and pried it out. You can also
use a dental-pick-looking tool - they sell sets of three or four (different
bends on each) at Sears or other auto parts places.
Also, to avoid scratching the shaft, I slipped a toilet paper tube over
it - just the right size. Used it again for the crank/front main seal. This
is not necessary but just be careful.
To seat the seals, you can do it the way they say, or you can go to Home
Depot and buy a short PVC pipe connector piece that is the same circumference
as the seal, put that over the shaft, place it against the new seal and tap
it in with a hammer. I bought two - you can just buy the longer one to be sure
it extends enough past the shafts it goes over. The smaller one is 2&3/4" long
and is 2" across the end. The longer one is also 2" across the end, but is 4"
long. This one is some sort of "T" connector because it has a third hole in the
middle, but that's okay; it was longer and that was all I needed.
Step 36 - I found the "Easy way" instructions almost impossible to understand,
but once you get it, it's really easy, so I'll just write it in different words
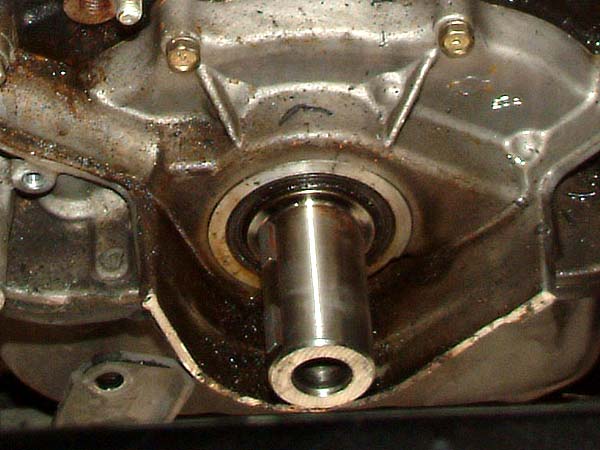
here. The "step" referred to in the instructions is visible in this photo:
That's the crank shaft and the crank seal, in place. The "step" is that metal
ring between the shaft itself and the seal, and the seal has to get over that
without any edges of the seal catching and pulling backwards. Much easier to
imagine when you can see what it looks like!
So what you're doing with the piece of Lexan/plastic is basically making a
shoehorn. Take the piece of plastic, rub motor oil all over it so the seal will
slide easily on it (oil up the seal, too), roll the plastic into a tube, put it
over the crank shaft and just over the edge of the step. Then slide the seal
down its length, over the step, and into position. Make the seal flush with
the metal.
Steps 45-46 - Pay attention to all notes regarding the 10 mm bolt, and when
the belt is on and set, don't forget to remove the bolt before putting everything
back together. That bolt is holding the tensioner at a certain position, and if
left it will not allow the tensioner to adjust its tension as the belt stretches
a little with use, and the timing belt will get loose.
Step 50 - I had to really wrestle with the bottom timing belt cover because
there are things in the way, so if you find yourself cursing at it, too, this
is normal. I have no tips for this except I think it went in finally when I was
under the car, not over it.
Step 54 - Make sure the edge of the thermostat is seated flat in the center
of where it goes, not off a little or it won't be sealing well. Remember you
have to turn it a little to get it to catch, and then you can let go and it'll
stay there.
Don't use a ton of silicone gasket maker so that it squirts all out the sides. If you
don't know how to apply gasket maker, ask someone who knows; otherwise
I'm assuming you know, so no instructions here.
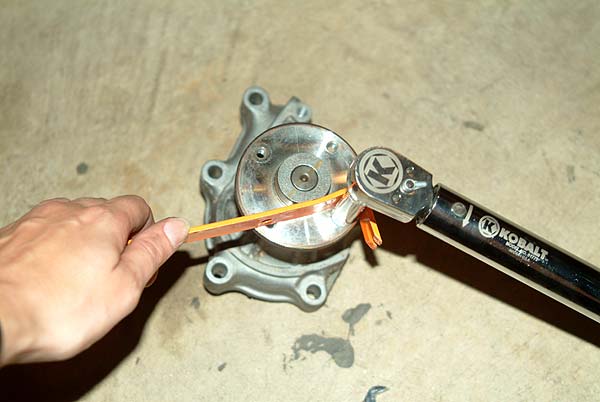
Step 56 - When you jam the two nuts against each other, you can force the
facets to line up so you can slip a deep socket over both. It's difficult to
remove nuts from a thing that turns, and this is how I eventually figured out
to do it (do not use a torque wrench - use a breaker bar instead. I learned that later):
Check for new studs in the box the water pump came in - I didn't discover them there
till after I went through the trouble of extracting the old ones to re-use.
Step 58 - I had some trouble getting the power steering pump belt on, and
Gary (SniPer SR71) sent me these instructions:
|
"In order to get the PS belt off you had to have it somewhat loose enough
to get it back on. There are two nuts/bolts in terms of the PS belt that will
be adjusted when installing/removing the PS belt. The first bolt goes through
a hole of the bracket on the passenger side of the car, I'll refer to as the
"tension bolt". Back this bolt almost all the way out so the pump will swing
down as far as possible to get the belt on. The tension bolt is a 12mm bolt
and is closest to the passenger side of the car in comparison to the other PS
bolts. The second one needing to be loosened is a nut that holds the PS pump
in place once and locks it in position once you have the belt at the correct
tension. We'll refer to this as the "PS lock Nut". This nut slides in an
opening that allows adjustment of the belt. The PS lock Nut is also a 12mm
and is facing the front of the engine. Make sure this nut is loose enough
to allow the PS pump to slide freely along the groove/slot. Once you have
both loose, from under the car you can wrap a belt around the PS pulley and
yank down on it to force it downward. If you are replacing this belt it may
difficult due to the fact the new belts fit tightly at the closest position.
It is important to back the PS tension bolt out far enough so the pulley is
at the closest loosest position. Another trick to getting it if you still don't have
enough play is to slip the belt over the pulley to get it started (hopefully
more than halfway) and twist the crank with a 27MM ratchet with extension to
force the belt on (similar to putting on a bike chain).
"Tension on the belts is pretty easy. Tighten them up so you can't move the
belts by hand more than about 1/4 of an inch (pretty tight). After you start
you car up it may squeak as the belts get broken in so you have to go back
and retighten them until they are quiet. It's important to understand how
the tension bolt and lock nut work together due to the fact you cannot adjust
the tension of the belt with the lock nut tight."
|
I used the "bike chain" method of putting the belts on - it makes it much
easier than trying to force them. Remember the shifter has to be in "Neutral" to
turn the crank.
Step 68 - These are the instructions Gary sent me about refilling
the coolant:
|
"There is an air release port located on
the top passenger side of the radiator that you should remove when filling.
After topping off the radiator, start your car and turn the heater on high
and continue to add water. Bring the water level up to where it begins
spilling out and cap everything off. Next, get in your car and watch the
temperature gauge, it should go to the 1/2 way mark and stay there. Rev
the engine up to about 5000 RPM a few times, shut it off and let the engine
cool. While then engine is shut off and cooling down, check for water leaks
around your water pump, radiator hoses etc. Try to be careful not to spill
water when filling the radiator (use a funnel) because it will be harder to
determine if you have a leak. Also use a mixture of distilled water and
coolant, if it's not pre-mixed. Once it cools off, remove the cap and check the
water level and
fill as needed. After you the think all of the air is out, cap off the cooling
system, start the engine again and turn your AC on high while monitoring
your temp gauge. If it doesn't go past 1/2 way mark, then you're OK for the
test drive.
"Also keep in mind not to over-tighten the hose clamps on the radiator. You
only want to snug these clamps but not over tighten them as it may break the
inlet / outlet port of your radiator if it's the plastic type. I always snug
them up then go behind and tighten them a little more after the engine is
hot and the hoses are more flexible. Always check the water level everyday
before driving and fill as needed. It sometimes takes a week to blurp all
of the air out but you can never be careful enough to prevent overheating."
|
Okay! After installing the lower shield, you're done. Congratulations!
- Ashley (TT XTZ on tt.net)
ashley at ashleybradford dot com